


Why use Kubernetes when the website can be deployed over a container using Docker? Kubernetes is a powerful tool which works on the top of the container technologies like Docker or Podman or CRI-o. Our operation guys do not need to study all these tools seperately beacause kubernetes is one such tool which will make your task easier and will use whatever technology you want, to manage your containers.
So, here in this article I developed an infrasturcture which contains all the powerful features provided by the kubernetes like deployment, service etc. and deployed a website. For making all the things highly automated, I used a CI/CD tool Jenkins and developed the following jobs:
In this architecture, Monitoring is not required, because instead of using Docker we have used Kubernetes that will manage the pods and redeploy them whenever needed.
JOB1
For complete automation so that jenkins come to know that the developer has pushed the code, i have used the method of remote triggers. This job would simply pull the file from the GitHub and would copy it in the base system folder task3.
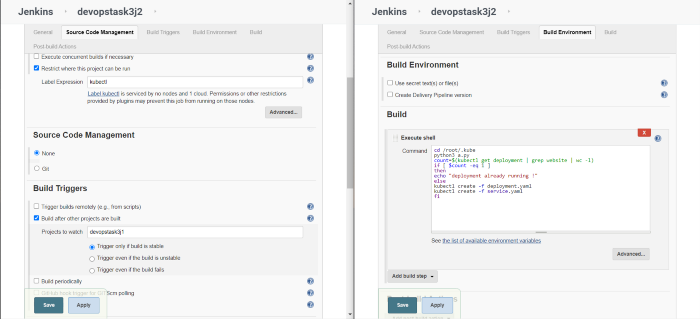
JOB2
In this job the kubectl commands won’t run on the local system, so we create a dynamic slave node setup with the configured kubernetes kubectl command . And for that we create another Docker file which will be used to create an image for kubernetes slave (the dynamic slave). Dockerfile that will be used by the jenkins to create the dynamic node whenever needed is
|
FROM ubuntu:16.04 RUN apt-get update && apt-get install -y openssh-server RUN apt-get install openjdk-8-jre -y RUN mkdir /var/run/sshd RUN echo 'root:redhat' | chpasswd RUN sed -i 's/PermitRootLogin prohibit-password/PermitRootLogin yes/' /etc/ssh/sshd_config # SSH login fix. Otherwise user is kicked off after login RUN sed 's@session\s*required\s*pam_loginuid.so@session optional pam_loginuid.so@g' -i /etc/pam.d/sshd ENV NOTVISIBLE "in users profile" RUN echo "export VISIBLE=now" >> /etc/profile #kubectl setup RUN apt-get install curl -y curl -LO https://storage.googleapis.com/kubernetes-release/release/`curl -s https://storage.googleapis.com/kubernetes-release/release/stable.txt`/bin/linux/amd64/kubectl RUN chmod +x ./kubectl RUN mv ./kubectl /usr/local/bin/kubectl EXPOSE 22 CMD ["/usr/sbin/sshd", "-D"] |
The dynamic slave node setup would allow us to launch the node as and when the demand comes and use it for running the jobs. when the demand is fulfilled the slave node is terminated on the fly.
Also, before configuring the slave node we need to make some changes inside our docker, because the tool that is used behind the scene for setting up slave nodes is docker.
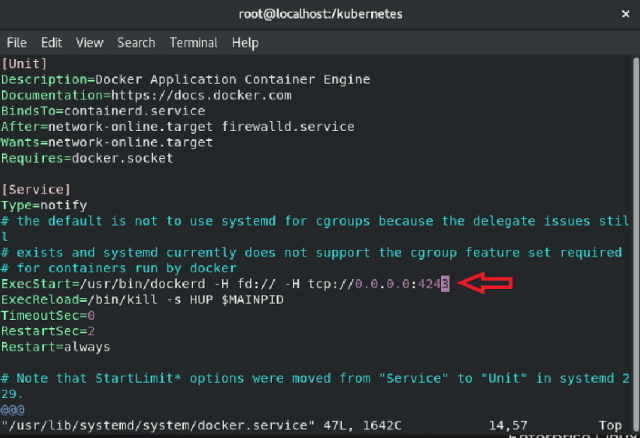
e need to edit this in the docker configuration file so that anybody from any IP can connect with docker at the specified port. Now, you can configure the slave node in the following way.
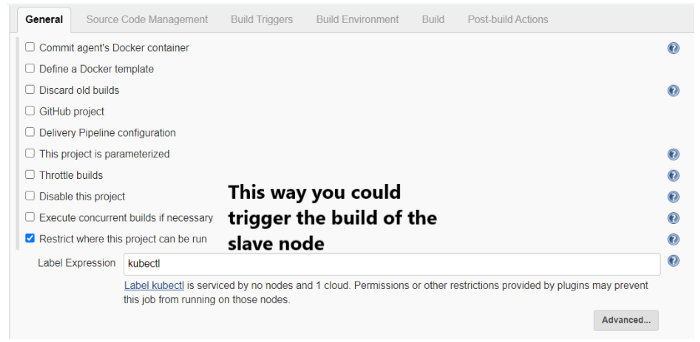
Manage Jenkins — Manage nodes and clouds — Add a new cloud
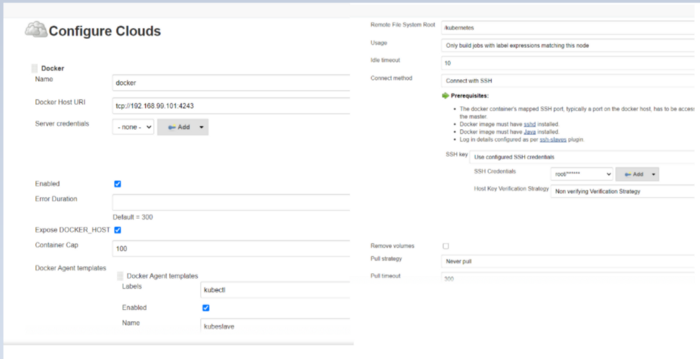
Along with these steps you also need to specify the volume ie. where all the files that are needed to run the kubectl are kept which are ca.crt, client.key ,client.crt and config file for kubectl.
Now for the deployment and the service configuration we created two config files
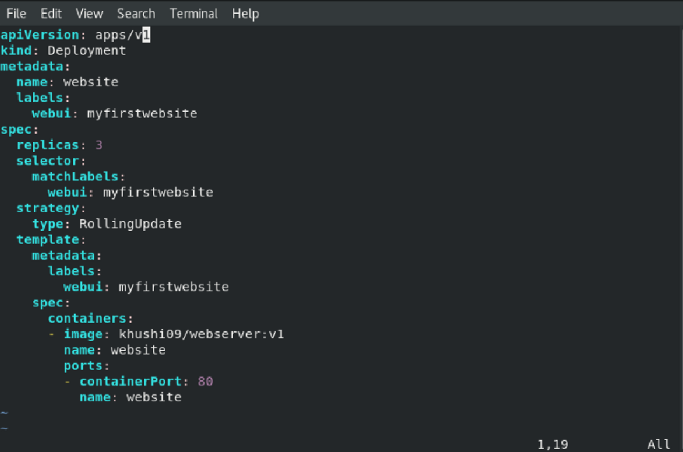
This file name is deployment.yaml

The file name is service.yaml
When job2 would start it would trigger the creation of the slave node with the required label.
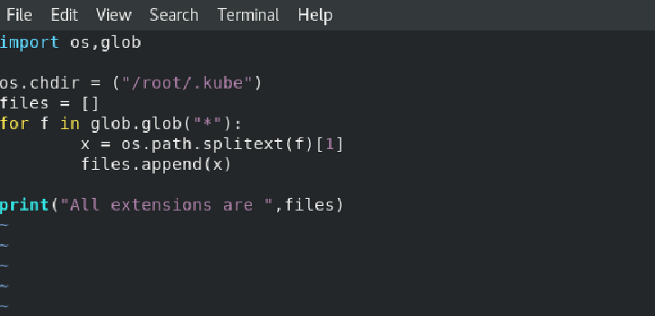
Job2 would first find out the extensions of all the files present in the mentioned folder using the following python code.
The rest of the code written will first check whether the deployment is created or not and if not would create deployment and service using the above yaml files.
Job3 would run on the slave kubernetes node as well and would check that if the deployment is running fine then using curl display the webpage content in the console output and if not then return 1 as the status code. This is just a trick that i used for the indication of unstable build which would further trigger the email sending process. Let us have a look at the console output of this job.
Now as the website is correctly deployed, Kubernetes will itself manage the pods and if any pod gets corrupted it will launch on its own

![]()
![]()
![]()
![]()
![]()
![]()